With the self-service and full-activation plan, you’ll have access to both the Ads Manager and the Builder. This setup allows you to create campaigns and creatives independently, while delivery is automatically managed by the Ads Manager. Your focus will be on building creatives and setting up the campaign — the system will handle the delivery automatically.
Creating a New Campaign
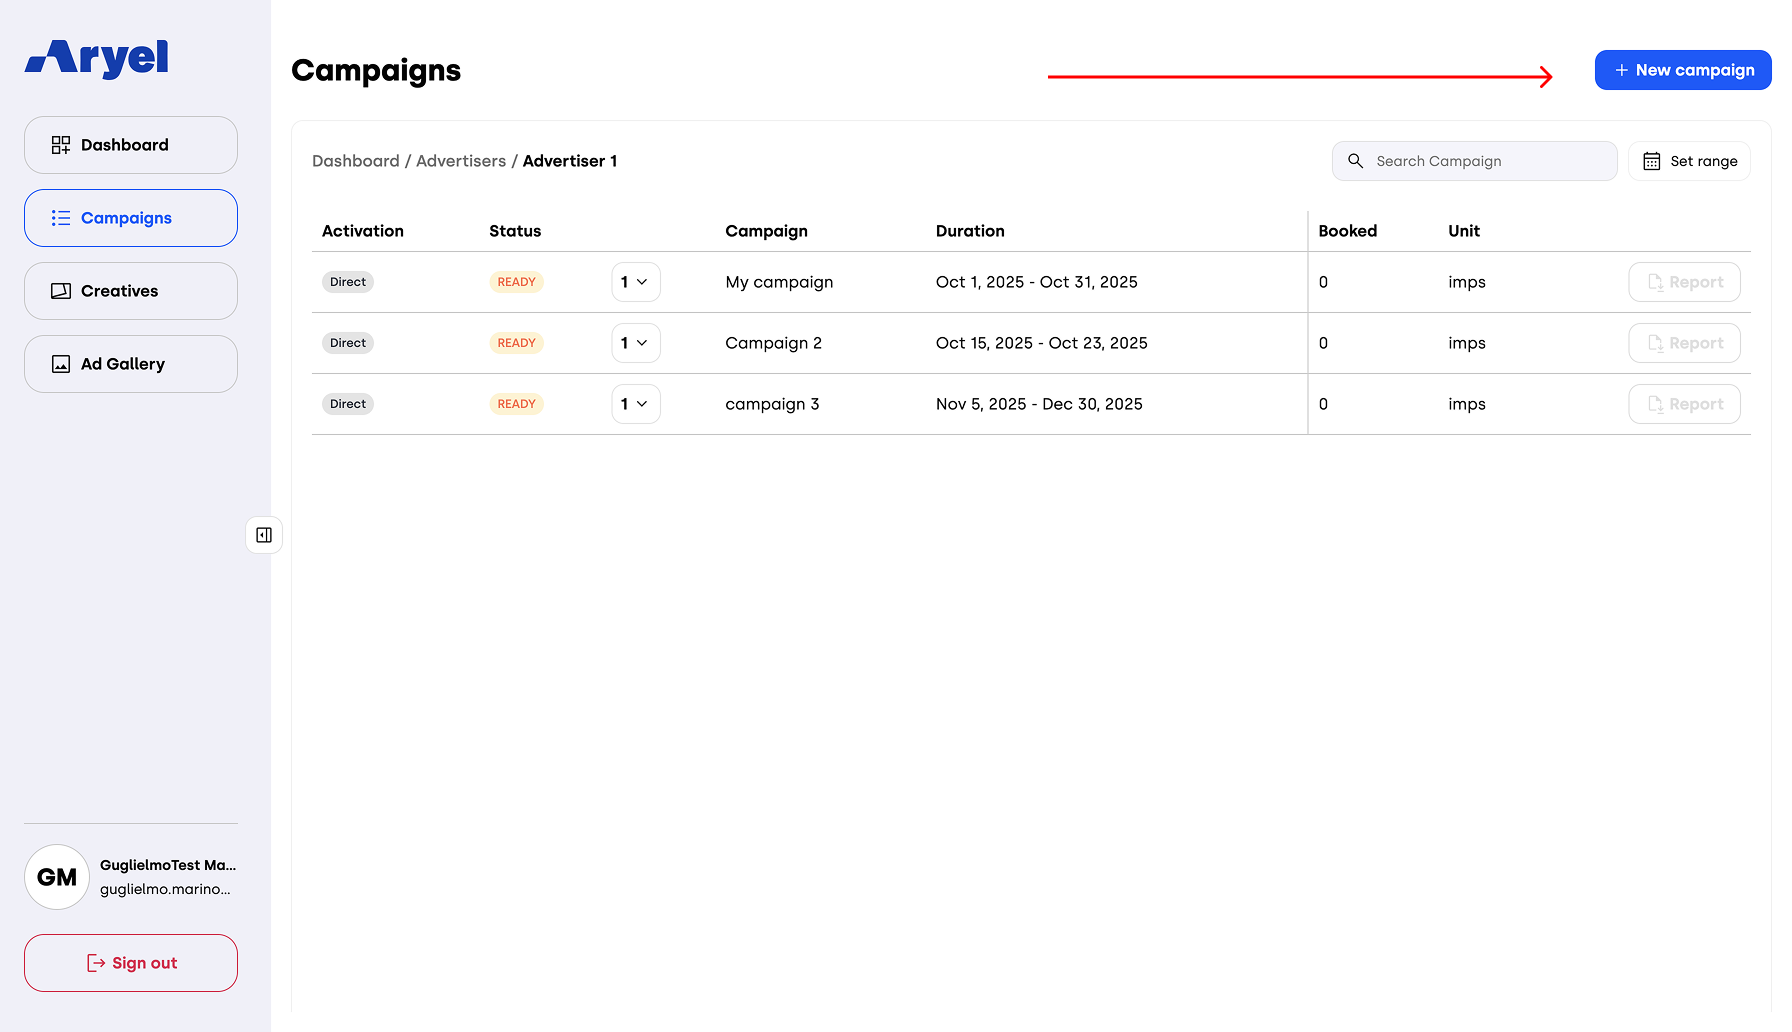
In the Campaigns section — either from the Advertiser List or the Campaigns List of a specific advertiser — you’ll find a + New campaign button in the top-right corner. Clicking it opens a form divided into three sections, where you’ll enter all the details needed to configure your campaign.
1. Info
In this section, you’ll enter the basic campaign information:
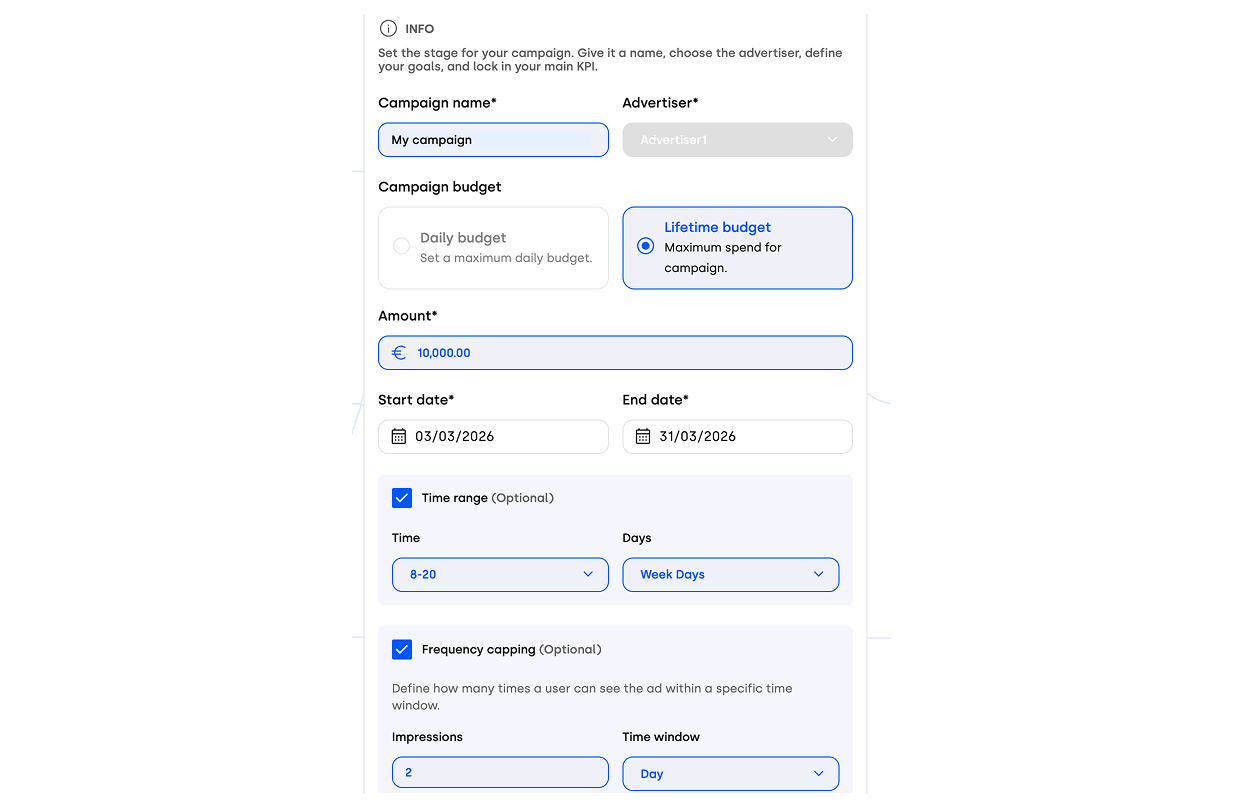
Campaign Name
Advertiser (this field will be pre-filled if you start from the campaign list of a specific advertiser)
Campaign Budget – Choose between two options:
Daily Budget: Set a maximum daily spend.
Lifetime Budget: Define a maximum overall budget.
After choosing your preferred option, enter the budget value in the field below.
Start and End Dates: Define the campaign duration.
Additionally, you can optionally enable the following settings by selecting the checkboxes:
Time Range: Define the delivery time window by selecting either 8:00 a.m. – 8:00 p.m. or 8:00 p.m. – 8:00 a.m. from the dropdown. You can also select the delivery days. The available options are Weekdays or Weekend.
Frequency Capping: Define how many times the ad will be shown to each individual user by setting the number of impressions and the time window.
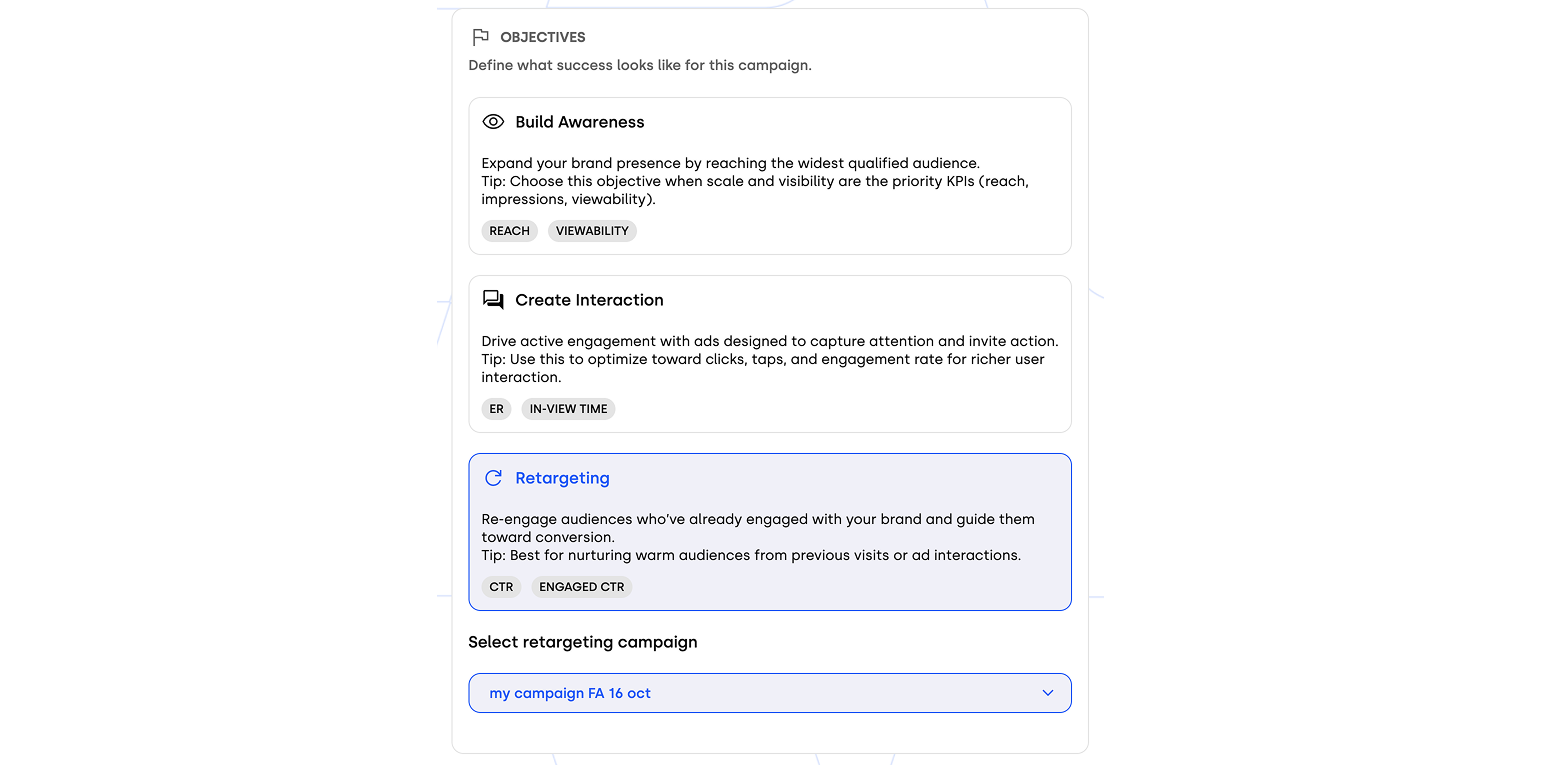
2. Campaign Objective
Here, you’ll define the main goal of your campaign. Choose among three options:
Build Awareness – Focus on Reach and Viewability KPIs. Expand your brand presence by reaching the widest qualified audience.
Create Interaction – Focus on In-View Time and ER. Drive users to interact with your ad therefore increasing the in-view time.
Retargeting – Focus on CTR and Engaged CTR. Re-engage users who have already interacted with your brand to drive conversions. Note: This option is available only if at least one previous campaign for the selected advertiser has been completed, as retargeting targets an audience already familiar with the brand.
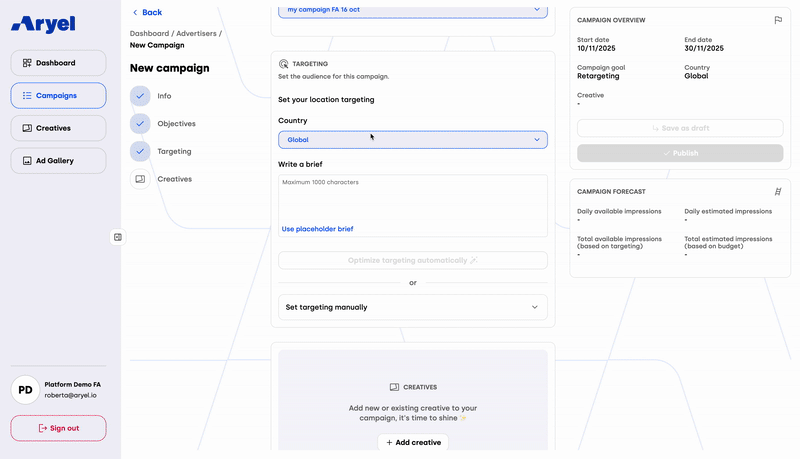
3. Target
In this section, you’ll define the audience for your ad delivery:
Location Targeting
For geo-targeting, you can choose from multiple levels of granularity by clicking the dropdown menu.

Each option allows you to refine where your campaign will be delivered:
Global – Delivery will run worldwide with no geographic restrictions.
Country – Select a specific country; the campaign will be delivered across the entire national territory.
Region – Define a multi-selection of regions across different countries, enabling more granular geographic coverage.
City – Similar to regions, you can select one or multiple cities to further refine delivery.
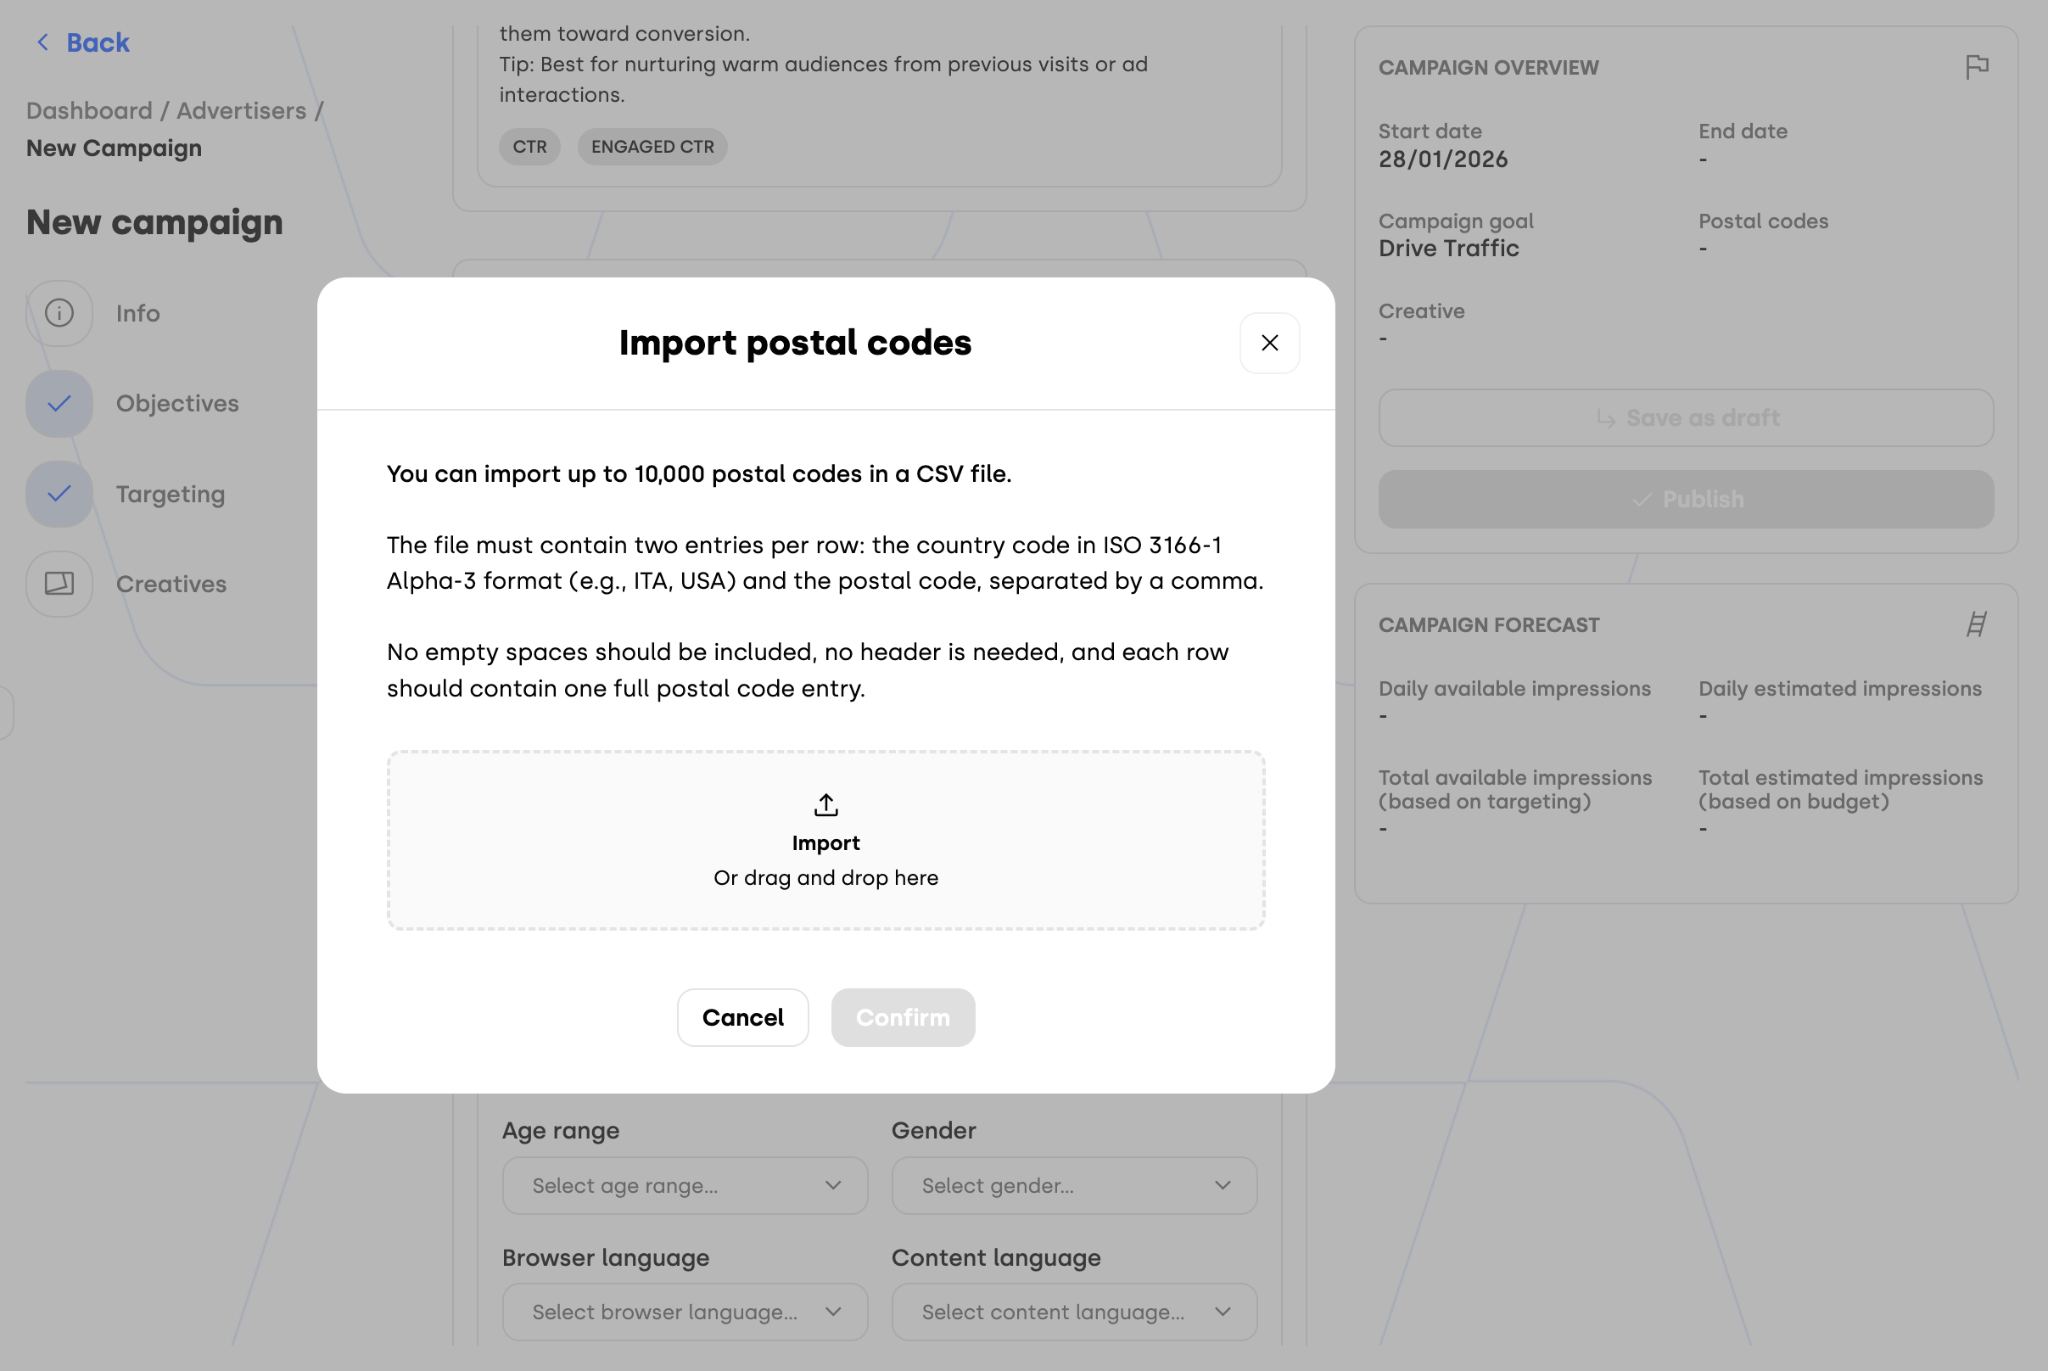
Postal Code – For the most granular targeting, click Import Postal Codes to upload a .csv file containing up to 10,000 ZIP or postal codes.
Targeting Options:
AI Optimization – Enter a prompt (in any language) and click Optimize Targeting Automatically. The AI will generate an optimized target for your campaign. After the optimization, you can still open the Manual Settings section to review the parameters defined by the AI and make any adjustments you wish — maintaining full control over your targeting setup.
Manual Selection – The first step in manually setting your target is to define key parameters: Age Range, Gender, Browser and Content Language, and the Delivery Platform — you can choose Mobile, Desktop, or Both.
Once these parameters are set, select your Audience from the Segment Directory. This section includes pre-built audience segments designed to deliver your ad to users interested in the selected topic and browsing related content.
After your audience is defined, move on to creating your Site List by manually selecting the websites where your ad will appear. The list dynamically updates based on the selected country, allowing you to add or remove sites individually for full control.
Just above your site list, you’ll find a toggle to disable delivery on Affinity Audiences. When switched off, your ad will run exclusively on the sites you’ve selected. Keep in mind that disabling affinity audiences may limit reach and reduce targeting accuracy — before confirming this action, a modal will prompt you to verify your choice.
You can also upload a Deny List (.csv) to exclude specific sites where you don’t want your ad to appear.
Linking a Creative
Once all required fields are completed, link a creative to your campaign by clicking + Add Creative.

A modal will appear with all creatives in your account — select one or click + New Creative to build a new one, starting from a template or from scratch.
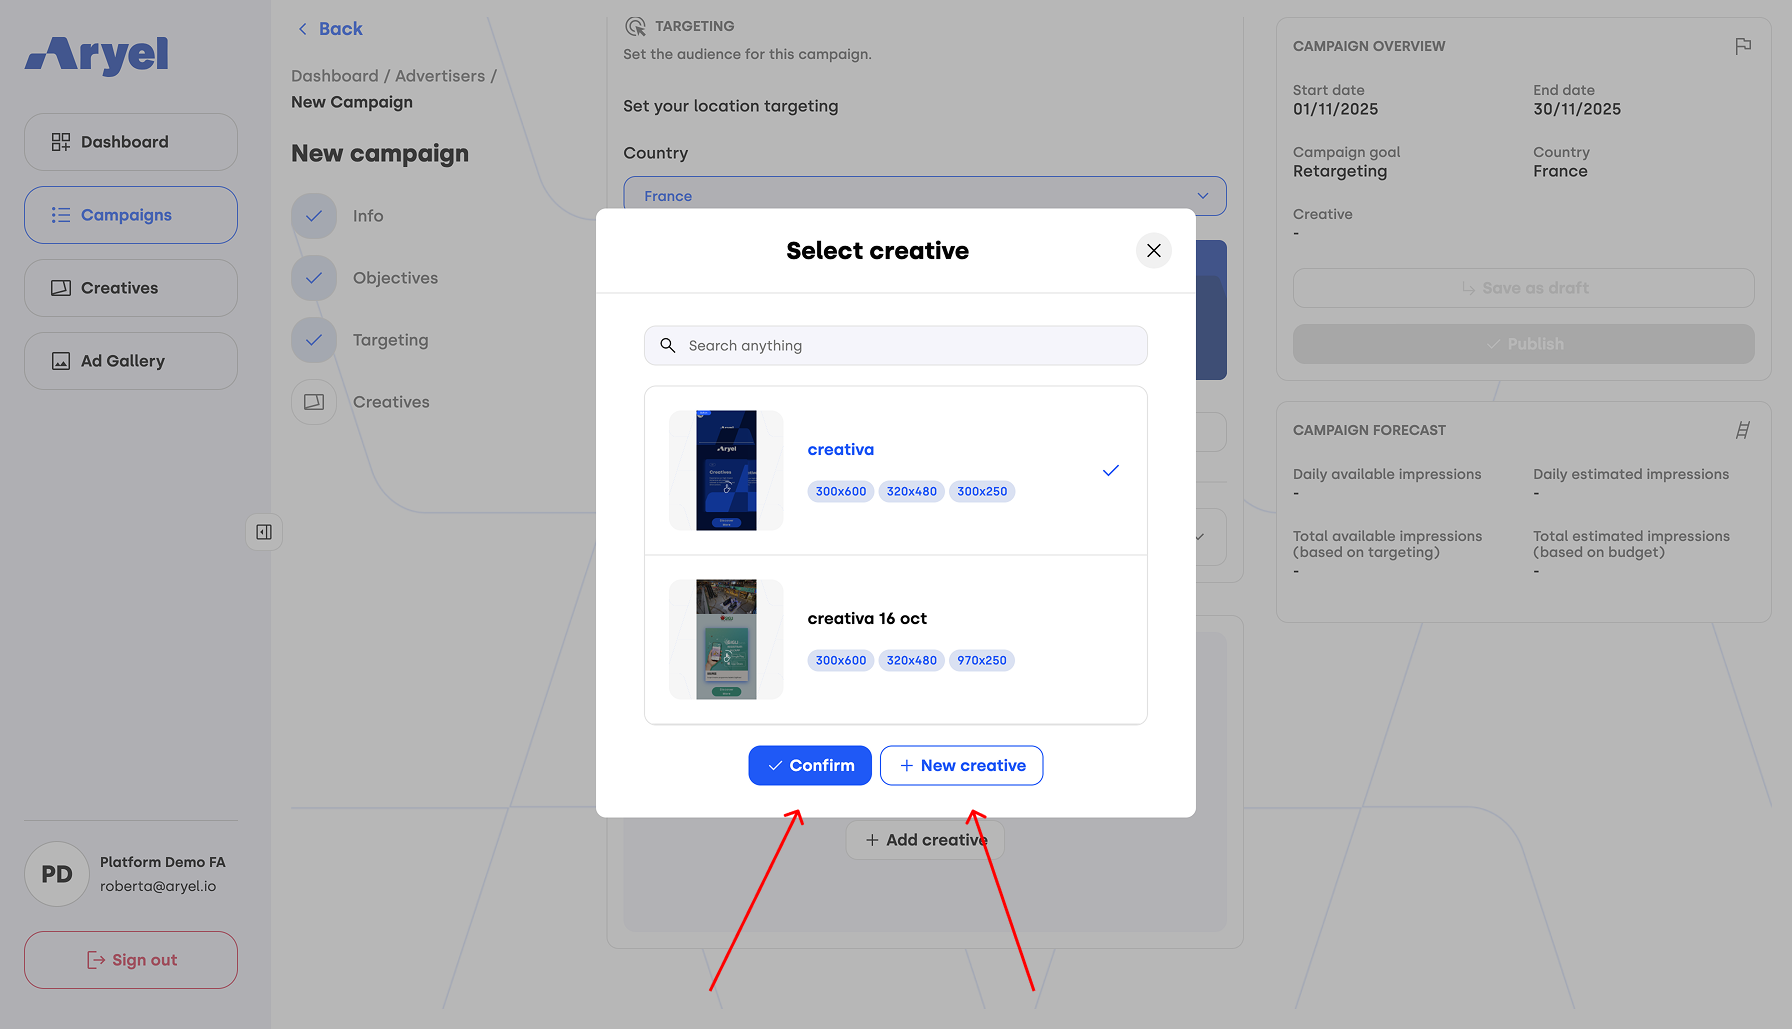
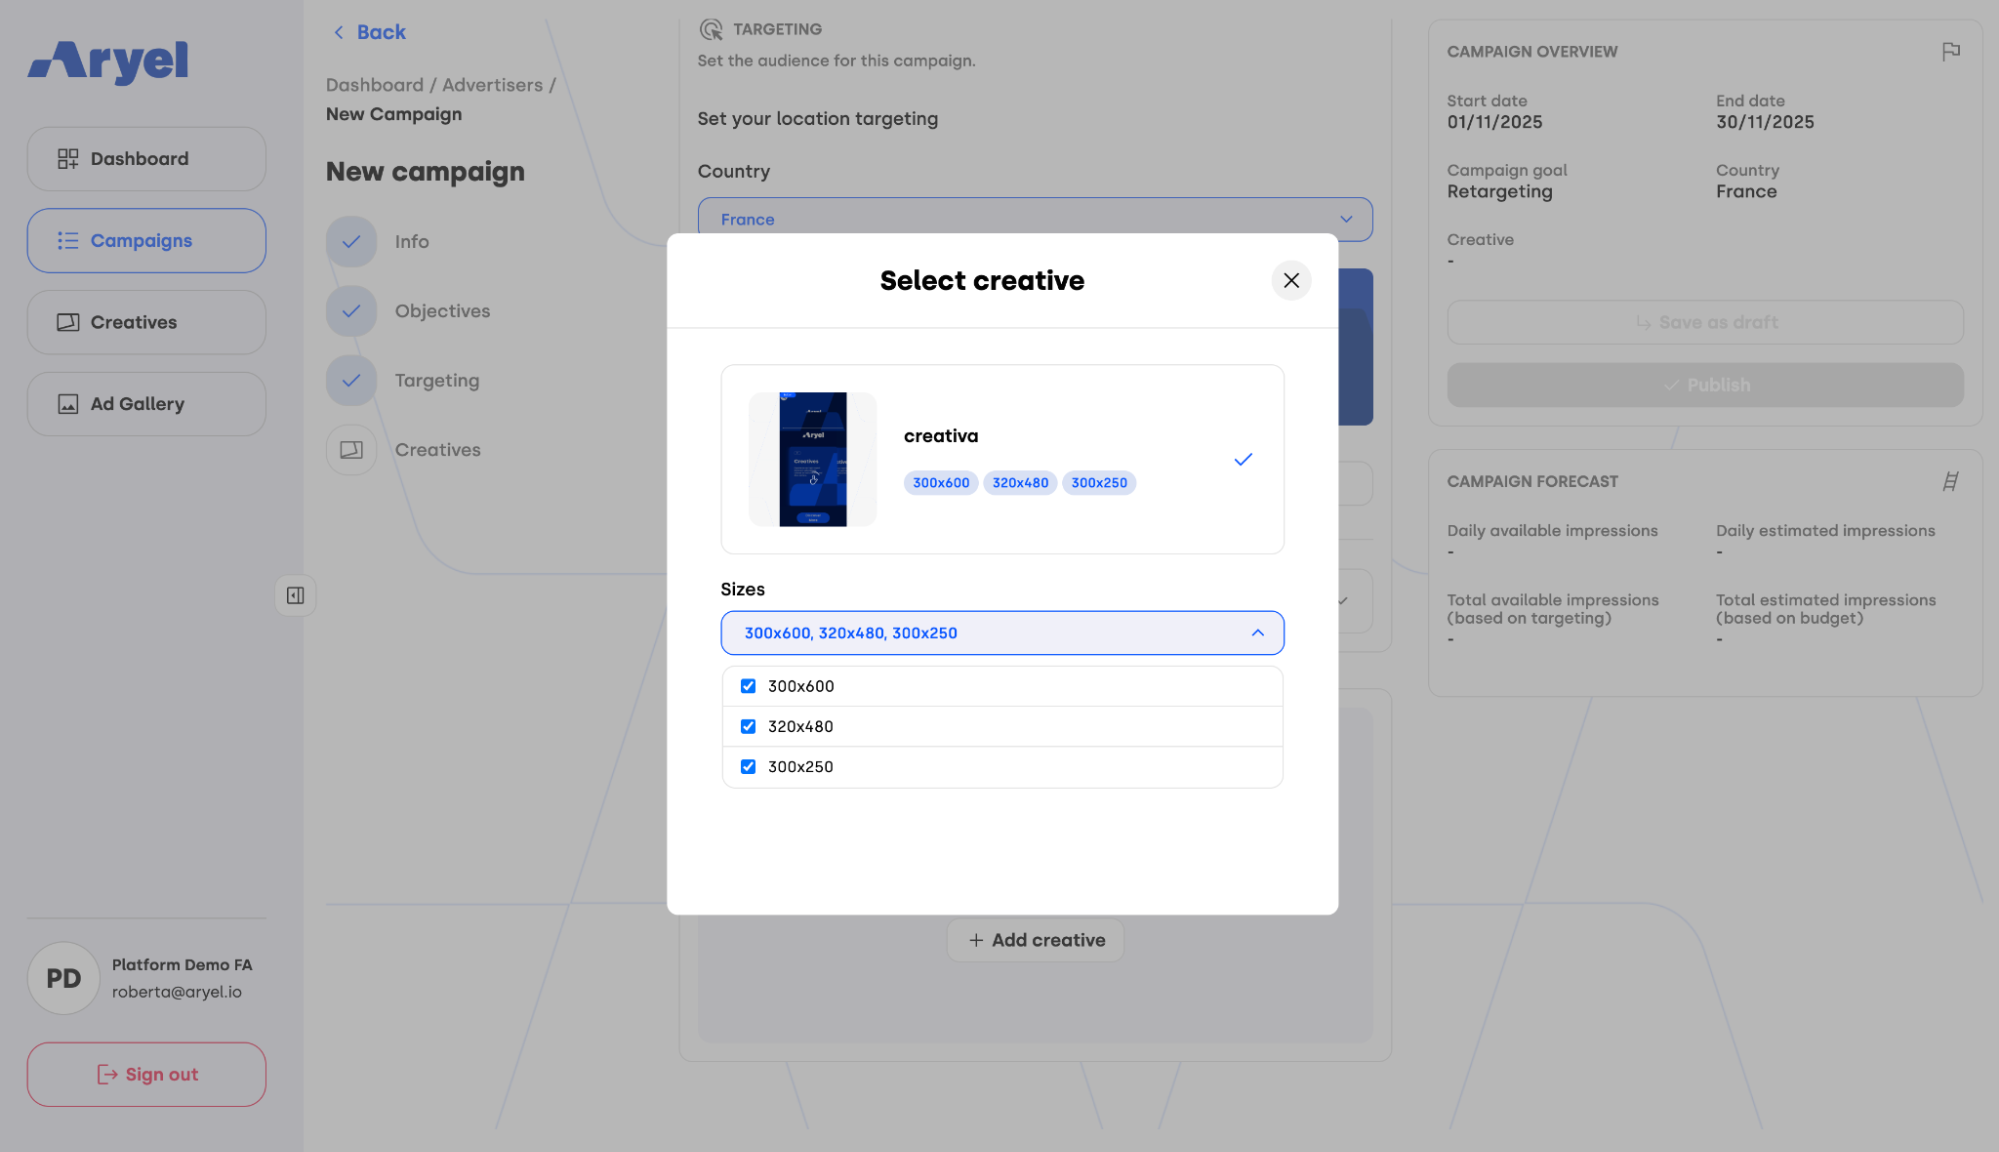
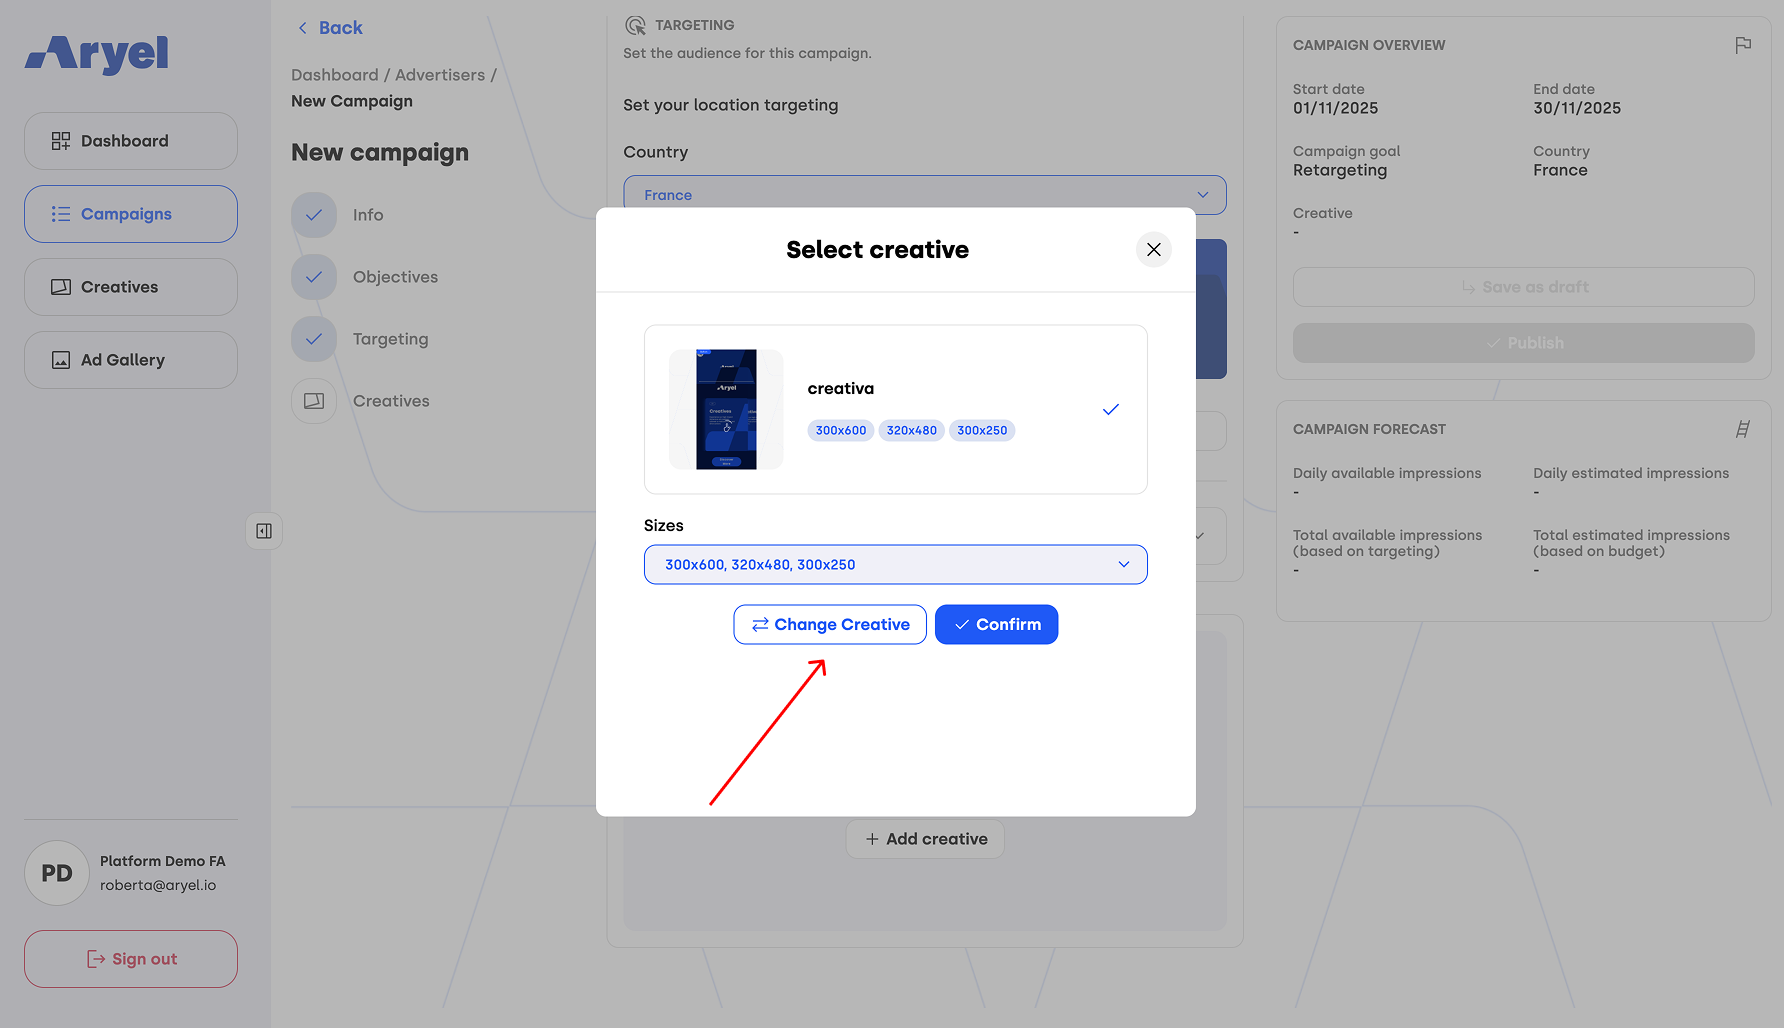
After selecting a creative, choose the supported sizes relevant to your campaign.
Once confirmed, the creative will be linked to your campaign. If you wish to change it, click Change Creative to select another.
Final Steps
When all fields are completed and the creative is linked, you have two options:
Save as Draft – The campaign will appear in the advertiser’s campaign list in Draft status and remains editable.
Publish – The campaign will move to Ready status.
Below the save options, you’ll find a dedicated Forecast Box, which automatically provides key projections based on your campaign setup:
Based on targeting
Daily Available Impressions
Total Available Impressions
Based on budget
Daily Estimated Impressions
Total Estimated Impressions
To help you assess campaign feasibility prior to launch, the Forecast Box includes a color-coded alert system based on the coverage ratio between available inventory and your budget:
🟢 Green (High): Available impressions are sufficient to fully cover the budget.
🟡 Yellow (Limited): Moderate availability. Delivery may be unstable, with a risk of under-spending.
🟠 Orange (Low): Coverage is significantly lower than needed, with a high probability of under-delivery.
🔴 Red (None): Available impressions are zero; the campaign cannot be delivered.
Important Note on Publication:
If the forecast shows zero availability (Red status), the "Publish" button will be automatically disabled to prevent the launch of non-deliverable campaigns.

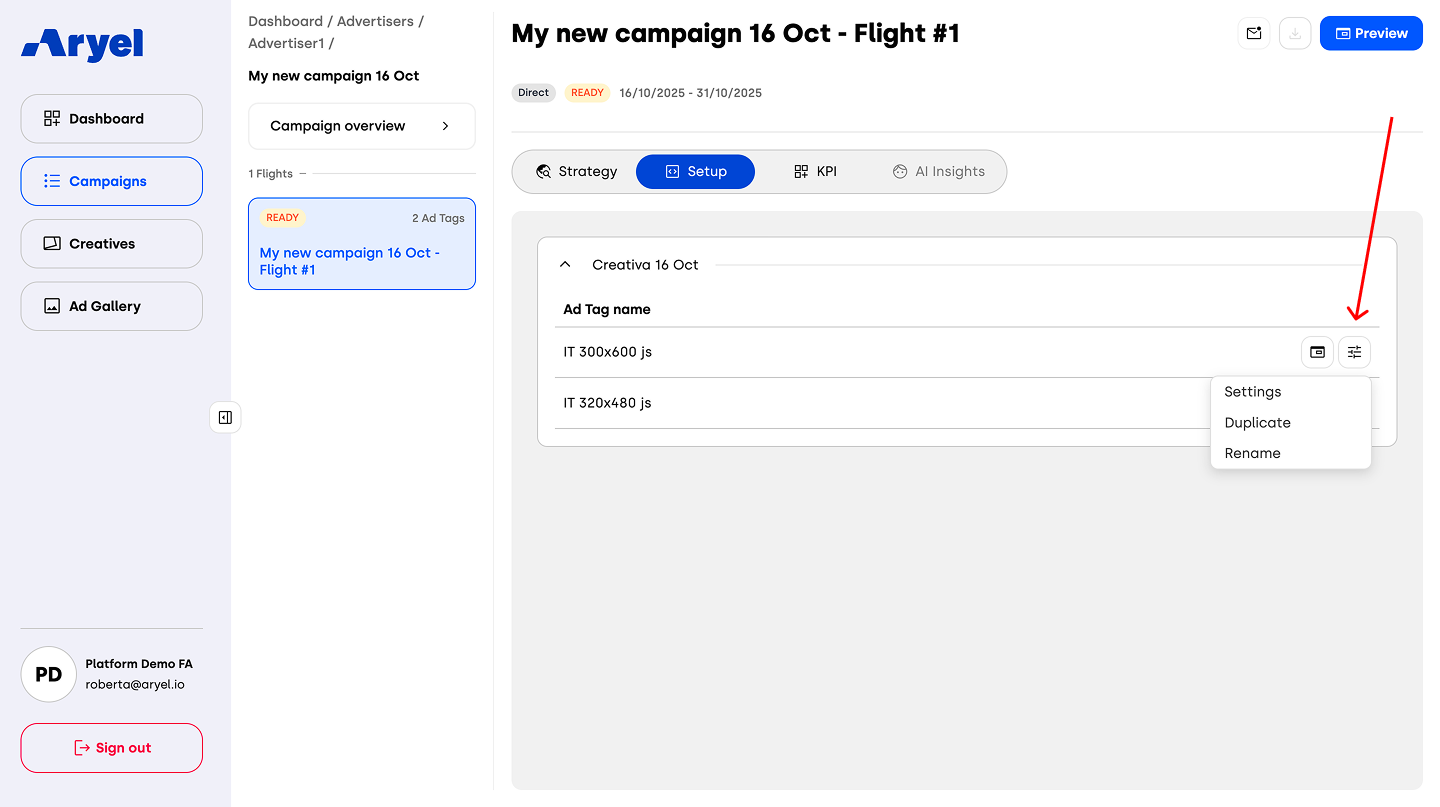
Once published, navigate to the Setup tab inside the Flight Detail Page. For each tag created (matching the selected sizes), you’ll find a Tag Settings button. Clicking this button opens a dropdown menu with the following options: Settings, Duplicate, and Rename.
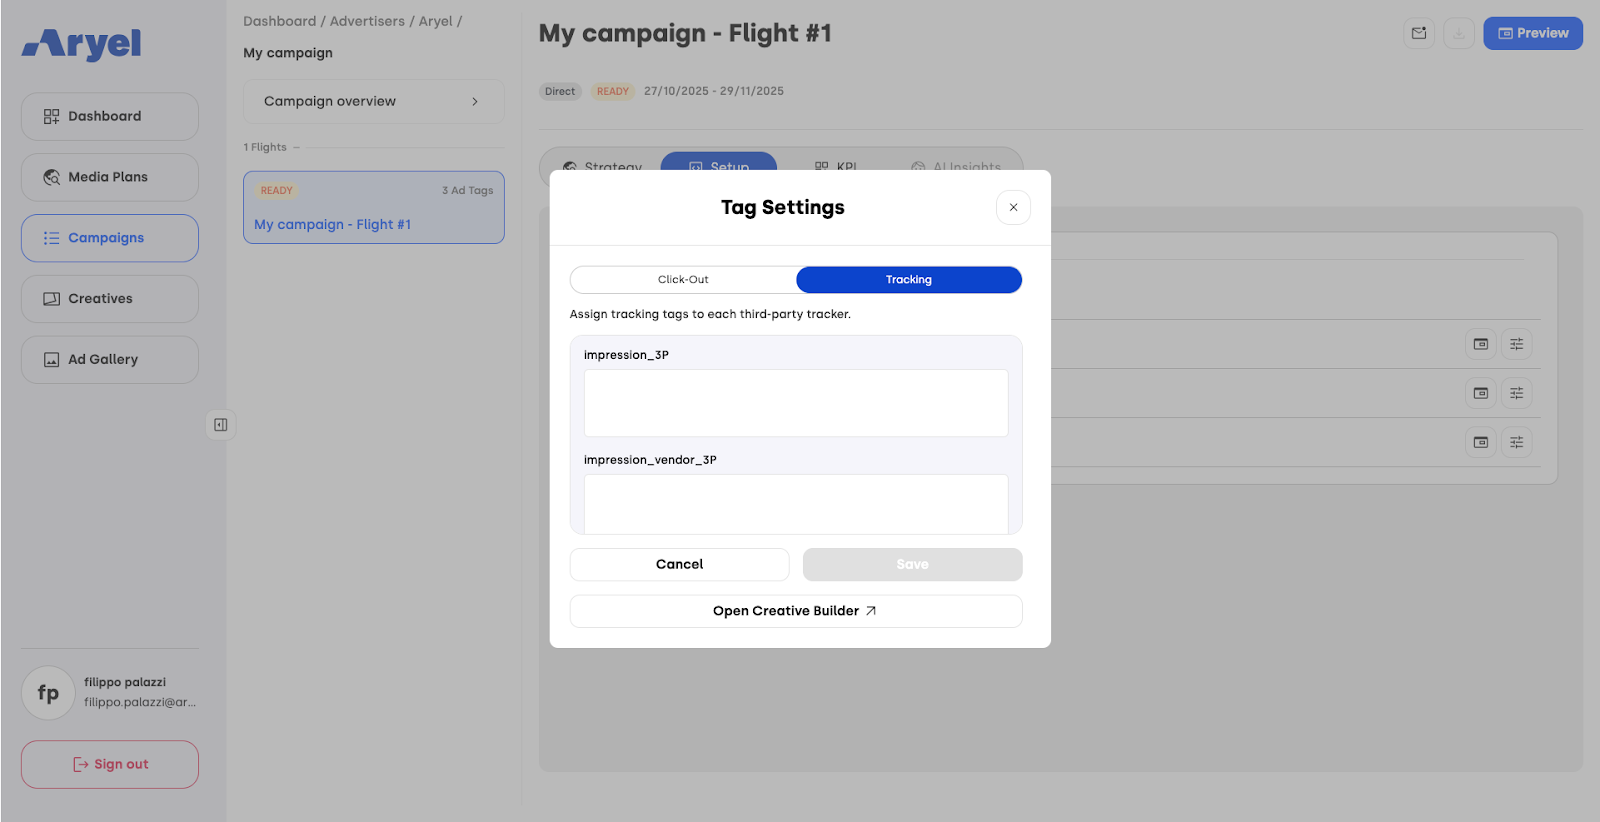
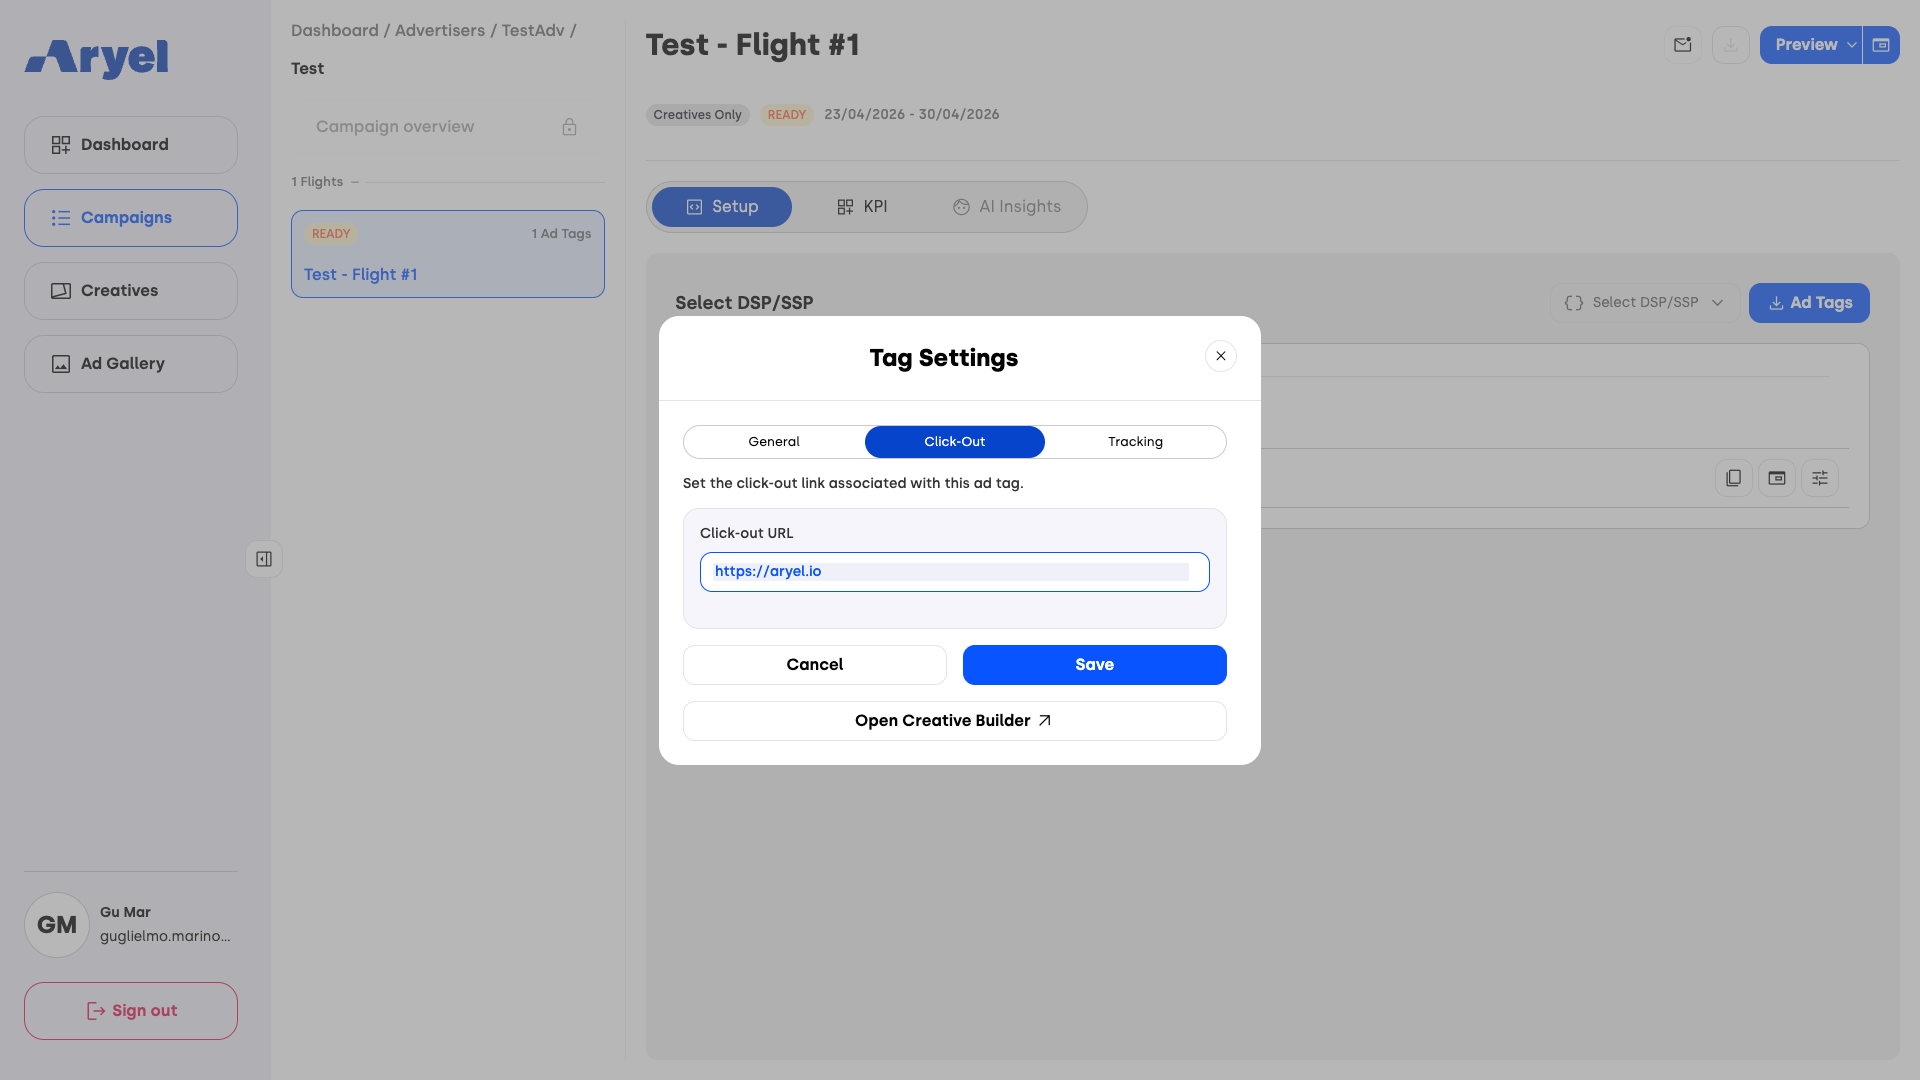
By selecting Settings from the dropdown, a modal will open. The structure of this modal differs based on the type of creative linked to the tag:
Standard Creative Settings (Non-VAST)
For standard display or rich media creatives, the modal is divided into two sections:
Click-Out – Enter the destination URL that the tag will point to.
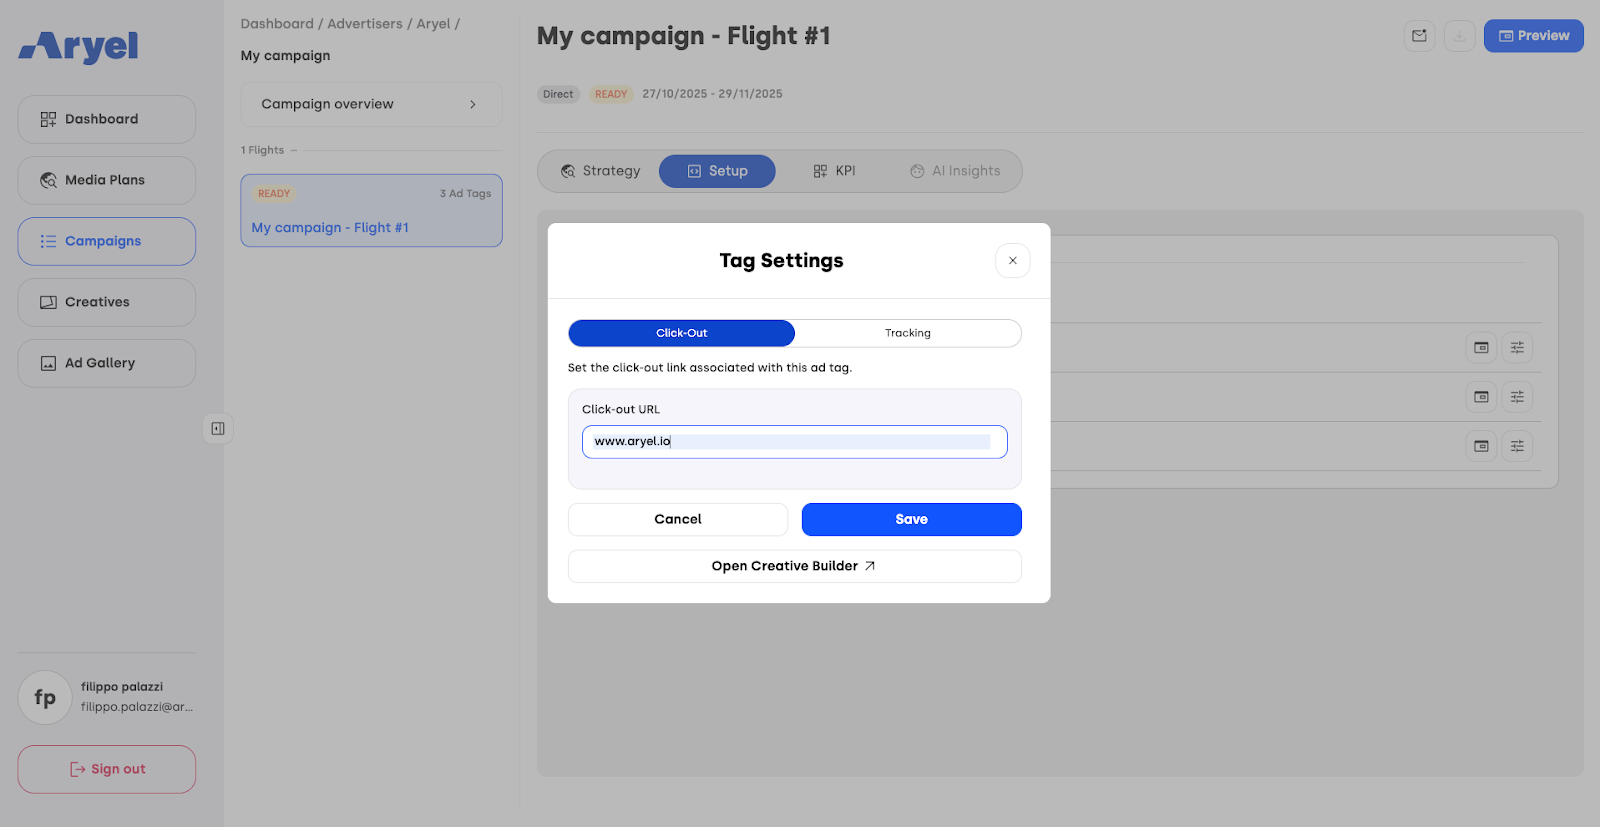
Tracking – Enter the tracking tags connected to the third party trackers included in the creatives, where needed.
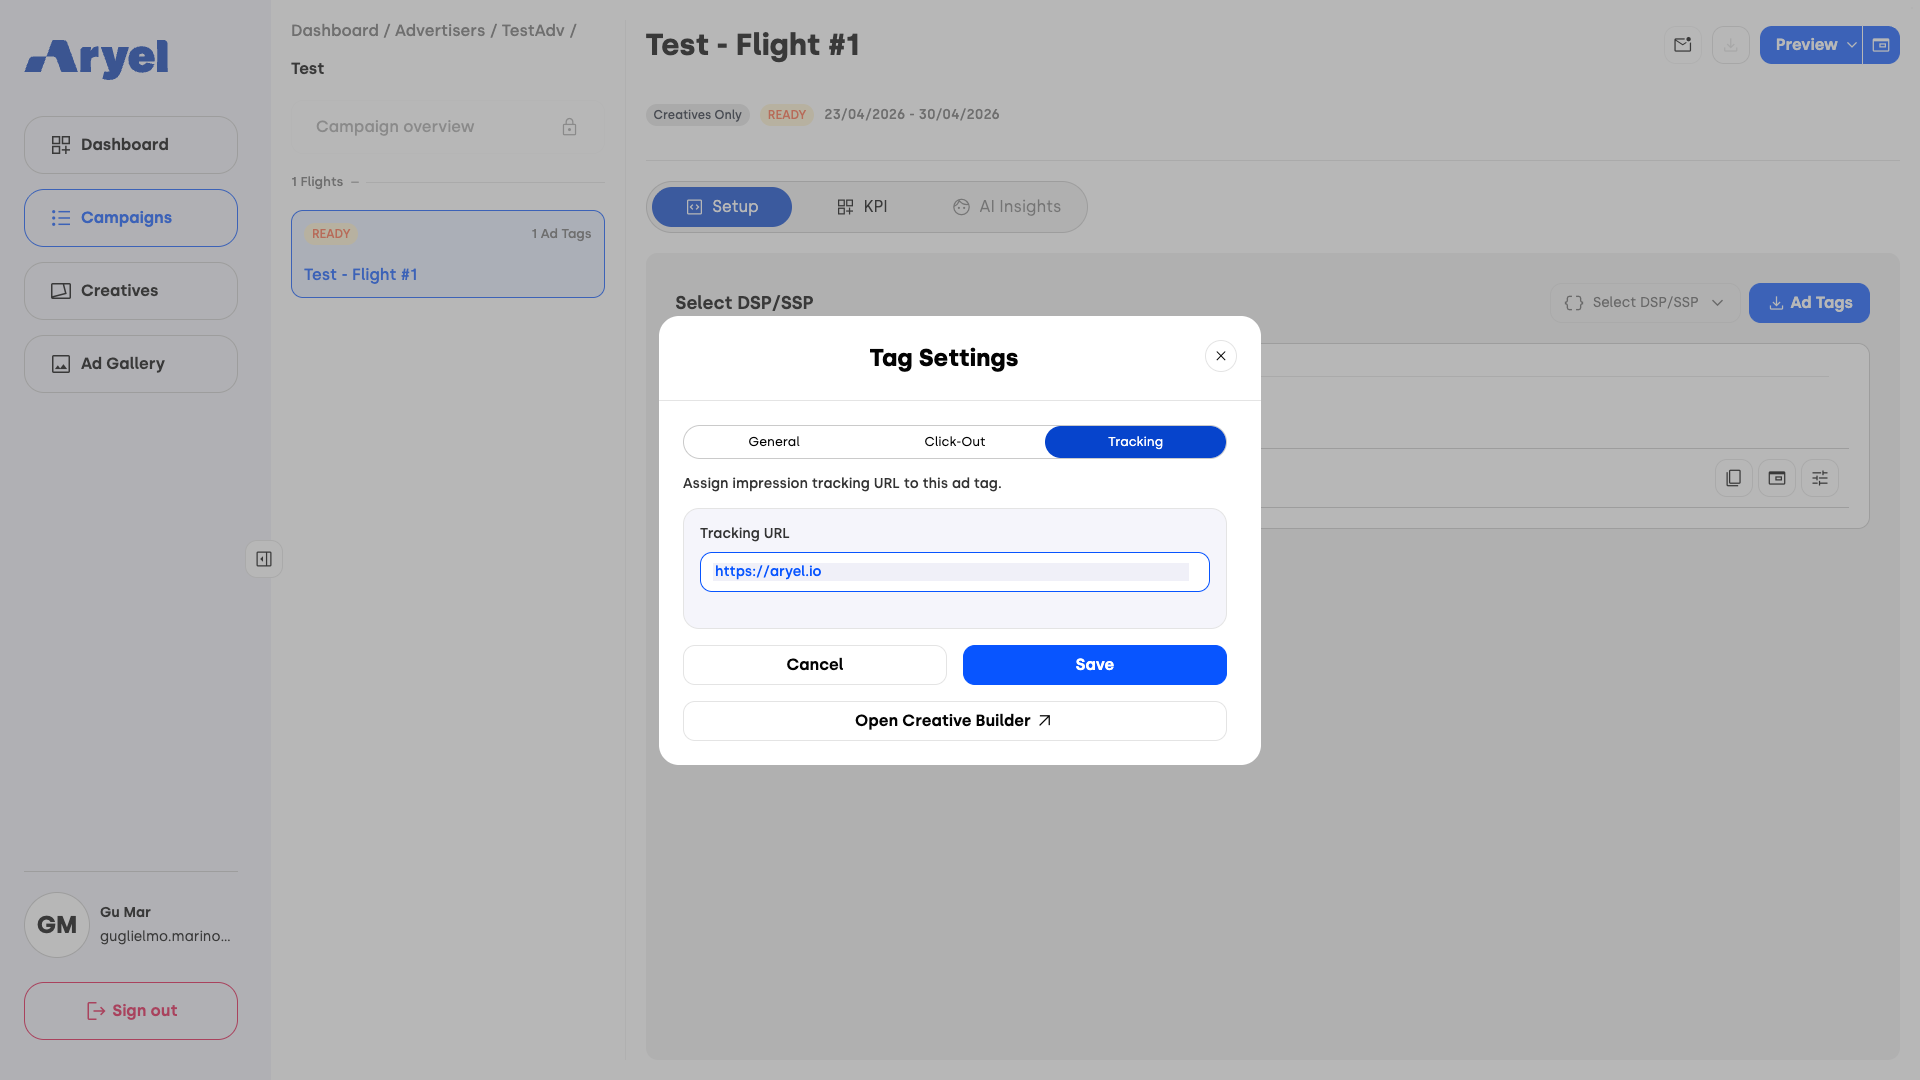
VAST Creative Settings
If the linked creative is a VAST (Video Ad Serving Template), the modal is structured into three specific sections:
General: Here you can select the VAST version. If no version is manually selected, the system will apply the default version (4.1).
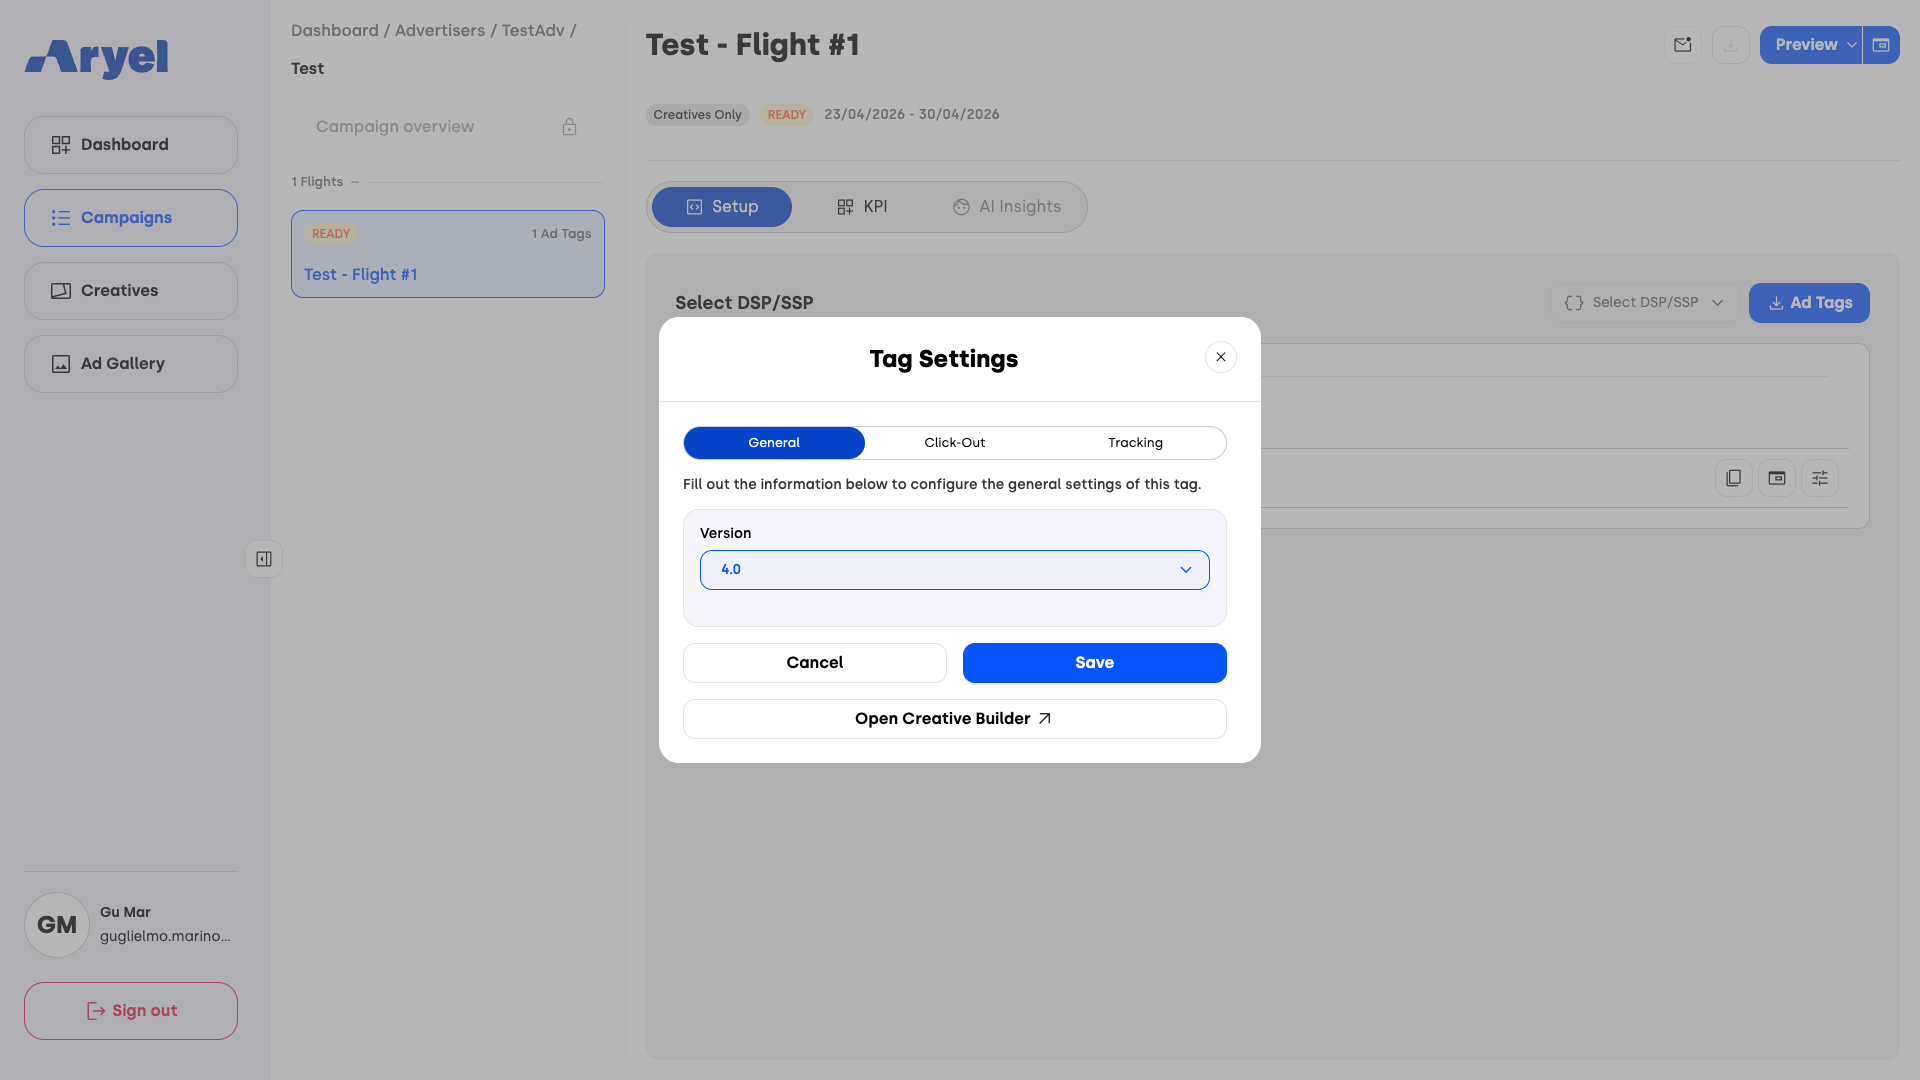
Click-Out: Enter the destination URL for the video redirect.
Tracking: Assign the impression tracking URL specifically to this ad tag.
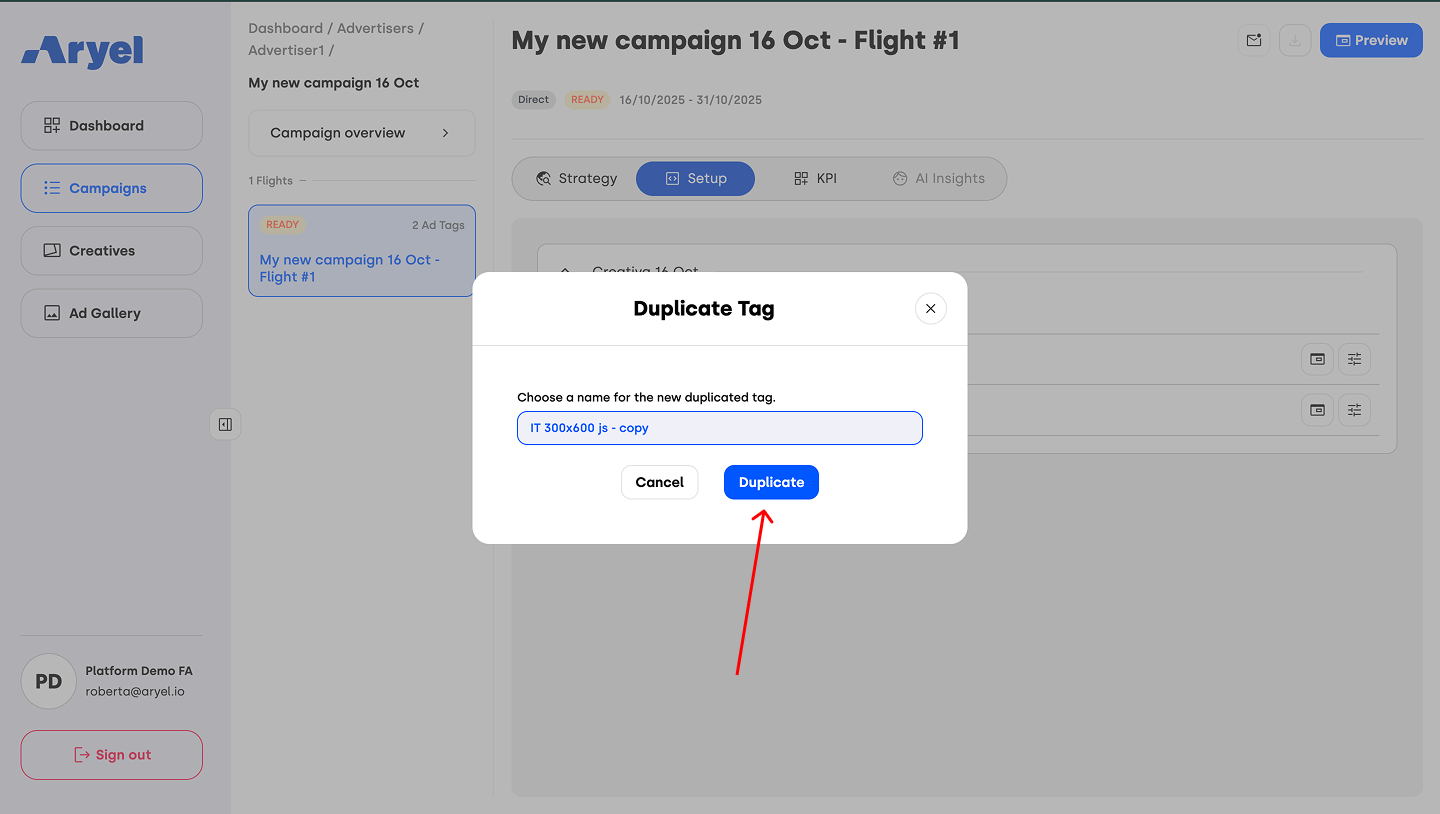
By selecting Duplicate from the options, a modal will appear allowing you to assign a name to the new duplicated tag. Once confirmed, the system generates a new instance identical to the original. This option is particularly useful if you need to assign different tracking tags or click-out URLs while maintaining the same creative content and sizes.
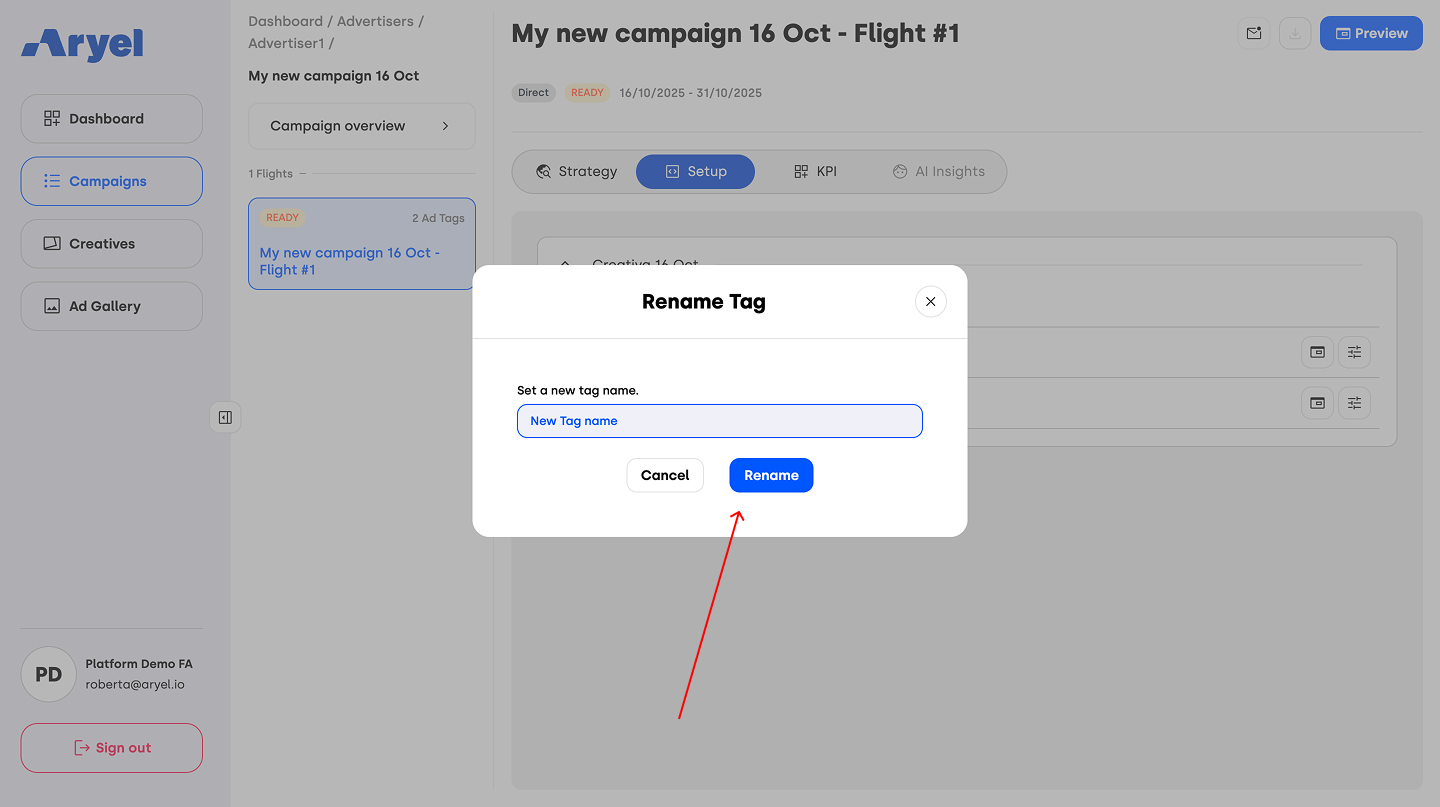
Additionally, by selecting the Rename option from the dropdown, you can simply rename the tag using a name that is more useful for your needs.
Once the tag setup is completed, delivery will automatically start on the campaign’s defined start date.
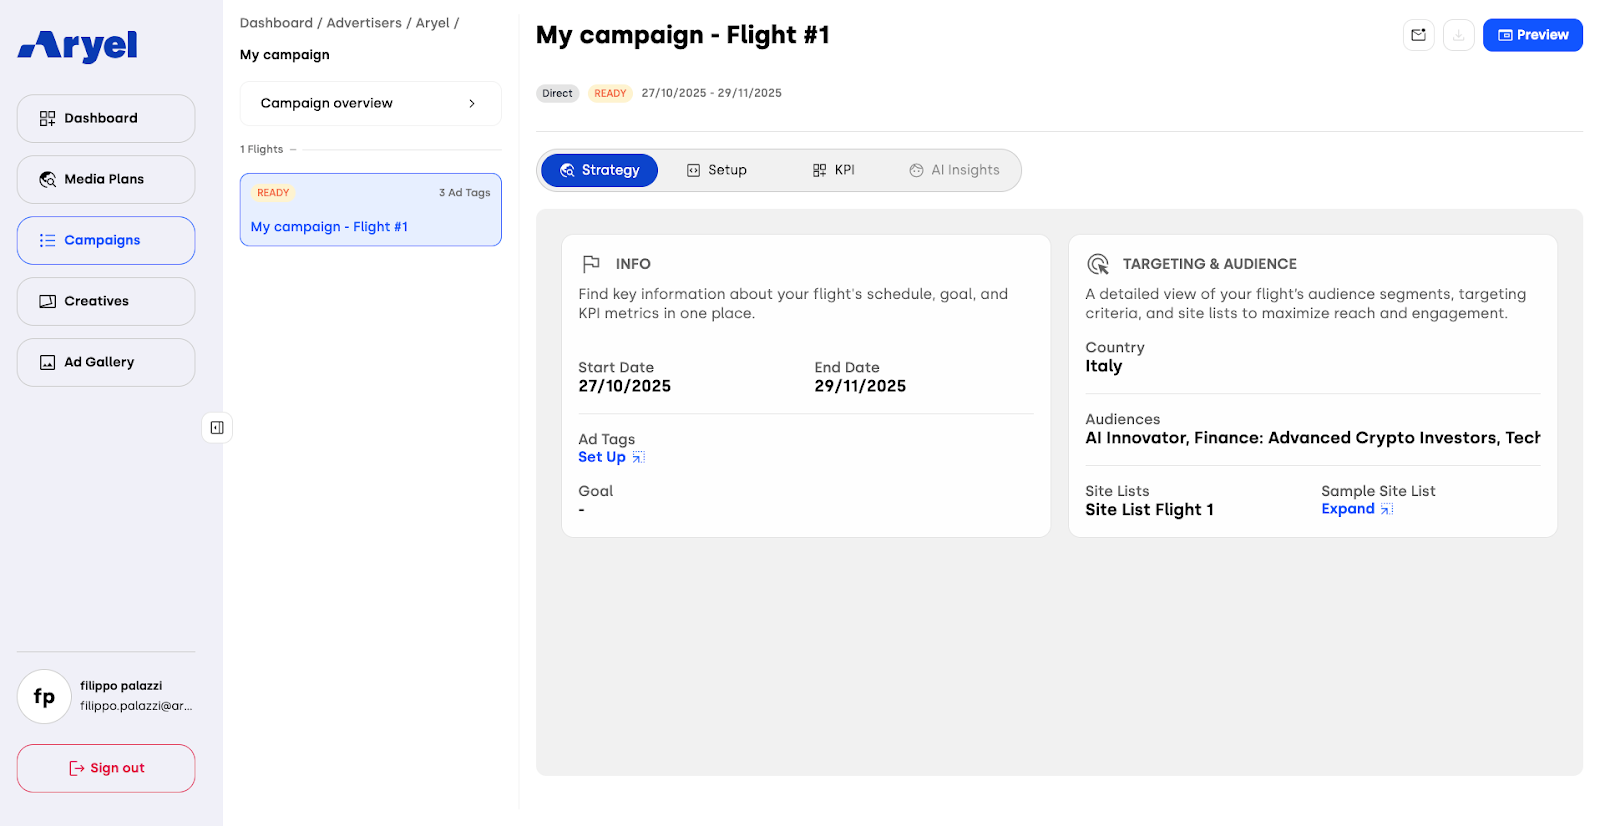
Still within the Flight Detail Page, you’ll also find another tab called Strategy, where you can view detailed information about the flight, such as the start and end dates, the Ad Tag label (clickable, redirecting you to the Setup tab), and the flight goal. A second section, Targeting & Audience, displays the country and audience associated with the flight.
This is the complete flow to follow when creating campaigns in Full Activation - Direct mode. With this setup, you can focus on designing compelling creatives and planning your campaign — the Ads Manager will take care of the rest, ensuring seamless delivery according to your setup.